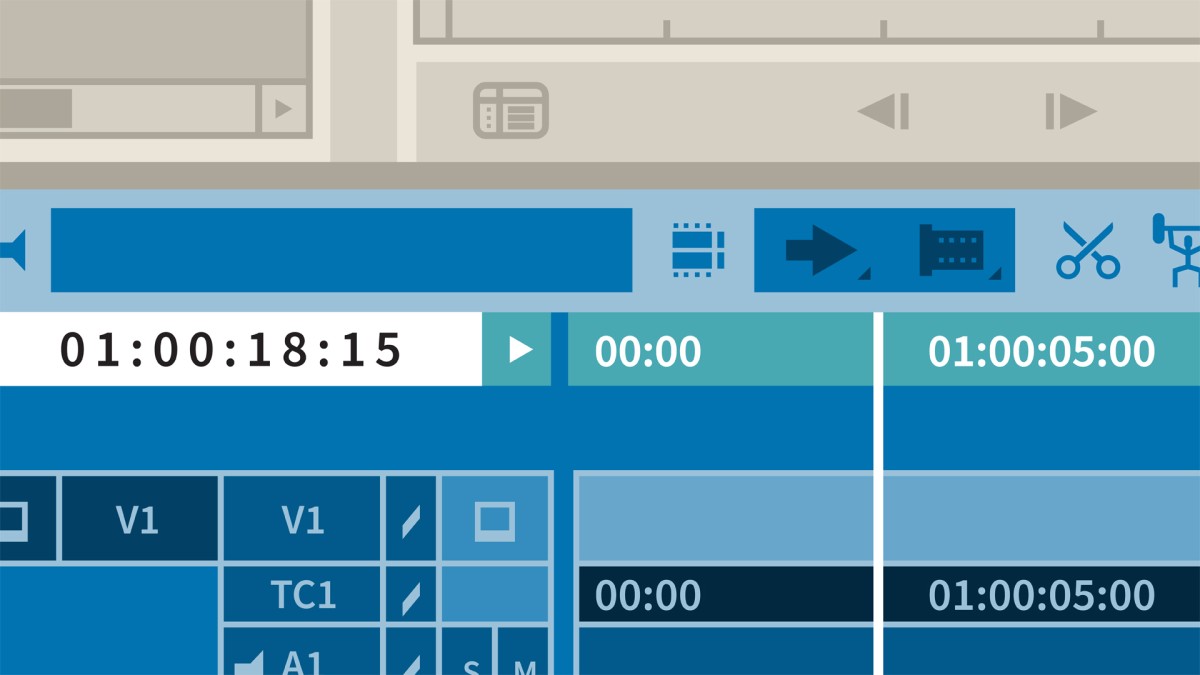
Introduction
Welcome to Avid Media Composer 110
()
Using the exercise files
()
What you should know before you begin
()
1. Fundamentals and Beyond
Learning the basic workflow
()
Video resolution terminology
()
About Avid codecs and resolutions
()
Creating custom projects
()
Create a 4K project
()
Creating a new user profile
()
Recap of the Avid Media Composer interface
()
Stay organized in your project
()
Project files and folders
()
Manage media scaling
()
Creating an All Columns bin view
()
2. Inputting Media
Review of importing media
()
Editing from the Source Browser
()
Using Consolidate
()
Transcoding linked media files
()
Transcoding a sequence
()
Background processing
()
3. Preparing Dailies
Work with text view
()
Cloning and duplicating clips
()
Open a bin from another project
()
Autosyncing picture and sound
()
Syncing clips with marks
()
Grouping clips
()
Using group clips in a sequence
()
4. Quick Editing Tools
Exporting and importing user profiles
()
Customizing user settings
()
Accessing macOS function keys
()
Create a stringout
()
Add a Timecode Burn-In effect
()
Setting up the Timecode Burn-In effect
()
Create a storyboard edit
()
Adding markers to your rough cut
()
Cutting down a sequence with Top and Tail
()
Using the Extend function
()
Adding markers on the fly
()
Edit faster with phantom marks
()
Ganging the monitors
()
5. Cutting and Recutting a Scene
Review of basic edit tools
()
Give yourself space to work
()
Creating sub-sequences
()
Go to Next Event and Go to Previous Event
()
The clipboard monitor
()
Displaying and navigating by Timecode values
()
Make quick selections
()
6. Trimming Dialogue
Review of Trim mode
()
Using Auto Focus when entering Trim mode
()
Using Small Trim mode
()
Mouse jog and mouse shuttle
()
Choosing audio trim side
()
Trimming with the keyboard
()
Adding and removing frames with the numeric keypad
()
Trim on the fly with the J, K, and L keys
()
Selective sync locks
()
Using Add Edit to trim multiple tracks
()
Changing the center of the trim playback loop
()
Scrubbing audio while trimming
()
Fixing broken sync
()
The Radio Edit technique
()
Slipping and sliding segments
()
7. Mixing Sequence Audio
Preparing the timeline for keyframing
()
Mixing audio efficiently
()
Setting up for audio mixing
()
Quickview of the Audio Mixer
()
Monitoring audio levels
()
Adjusting level and pan in the Audio Mixer
()
Setting pan and level for multiple segments
()
Changing the gain level of master clips in a bin
()
Changing the output volume of the sequence
()
Audio EQ tool
()
Adding and adjusting keyframes in the timeline
()
Applying automation gain
()
Copying and pasting keyframes
()
Audio ducking
()
Adding audio effects to a track
()
8. Work with High-Resolution Media
Fixed and elastic keyframes
()
Understanding adapter icons
()
Hiding adapter icons
()
Exploring the Source Settings dialog box
()
Update source adapters in a sequence
()
Using FrameFlex to modify shots in the timeline
()
Using keyframes to animate the FrameFlex effect
()
Introducing keyframe graphs
()
Changing the behavior of the animation between keyframes
()
Adding movement to a photo with FrameFlex
()
9. Creative Retiming Effects
Performing a fit to fill edit
()
Understanding the Timewarp Speed Graph
()
Creating freeze frames
()
Creating a motion effect
()
Comparing motion effects and Timewarp effects
()
Creating Timewarp effects
()
Keyframing a Timewarp effect
()
Using the Anchor Frame
()
Using Trim to Fill
()
Working with Timewarp effects
()
10. Tracking and Blurring Objects
Creating a blur effect
()
Setting up tracking for an effect
()
Setting a region to blur
()
Blurring multiple regions
()
11. Multilayer Effects
Creating a split-screen
()
Three-point editing review
()
Reverse three-point editing review
()
Create a multilayer PIP
()
Animating the 3D PIP effect
()
Selectively viewing tracks
()
Adding multiple graph keyframes
()
Removing keyframes
()
3D rotation
()
12. Nesting Effects
Autonesting
()
Changing the order of nested effects
()
Adjusting nested effects
()
Editing inside a nest
()
Collapse tracks
()
13. Rendering Effects
Measuring performance
()
Rendering individual effects
()
Rendering multiple effects
()
Controlling render speed and quality
()
Partial rendering
()
Clearing existing renders to facilitate re-rendering
()
14. Creating Chroma Key Effects
Viewing the SpectraGraph
()
Set up a sequence for chroma key
()
Applying the SpectraMatte effect
()
Viewing the Matte channel
()
Cropping the SpectraMatte effect
()
Adjusting the SpectraMatte
()
Dealing with spill
()
Refining the edges of the matte
()
Adjusting SpectraMatte scaling and position
()
15. Reviewing Your Project
Using the Timecode window
()
Adding Timecode Burn-In
()
Creating a watermark
()
Using full screen playback
()
16. Output
Mixing down video
()
Timing your sequence start
()
Adding bars and tone
()
Mixing down audio
()
Preparing to output from mixdown files
()
Configuring export settings
()
Creating an export preset
()
Customizing a Send To template
()
17. Managing Project Media
Identifying a media file
()
Restoring master clips to a bin from the Media tool
()
Deleting render files with the Media tool
()
Deleting unused project media
()
Deleting all project media
()
Back up your project
()
Conclusion
Practice media
()
Goodbye
()
Ex_Files_Avid_110_Assets_02.zip
(1.9 GB)
Ex_Files_Avid_110_Assets_03.zip
(1.9 GB)
Ex_Files_Avid_110_Assets_04.zip
(1.9 GB)
Ex_Files_Avid_110_Assets_07.zip
(1.9 GB)
Ex_Files_Avid_110_Assets_05.zip
(1.9 GB)
Ex_Files_Avid_110_Assets_08.zip
(1.9 GB)
Ex_Files_Avid_110_Assets_06.zip
(1.9 GB)
Ex_Files_Avid_110_Assets_01.zip
(1.9 GB)